

Insights
How to Find the IP Address of a Printer
Find your printer's IP address using its display, a network report, Windows or Mac settings, or your router. Confirm the address before printing.
The quickest starting point is your printer’s display: open its network or wireless settings and look for IP Address or Network Status. If you cannot find it there, print a network configuration report. You can also check an already-installed printer’s details on Windows or Mac, or your router’s connected-device list. A USB-only printer may not have a network IP address.
Find the address on the printer’s display or network report
The printer’s display or a fresh network report provides its reported address directly in most cases. Check the active Wi-Fi or Ethernet connection, rather than an interface that is disconnected.
- Turn on the printer. Wait until it is ready, then open its settings using the display or control-panel buttons.
- Open the network settings. Look for Network, Wireless, or a similar menu. Labels can include Network Configuration, Wi-Fi Status, TCP/IP Settings, or Network Info, but the exact path varies by model.
- Find the address field. Look for IP Address or Network Status. An illustrative address is
192.168.1.45; use the address your printer actually displays. - Print a report if the display does not show it. Follow your model’s manual to print a Network Configuration, Network Status, or equivalent report. On applicable printers, the Connectivity section lists the IPv4 or IPv6 address.
- Record the active connection’s address. Do not copy the gateway address or MAC address instead. If the report lists separate wired and wireless information, use the interface through which the printer is connected.
The field label matters more than the appearance of the value. A gateway address belongs to the network’s routing connection, while a MAC address identifies a network interface; neither is a substitute for the printer’s IP address. Keep the report nearby so you can compare it with the computer’s saved settings or the router’s entry.
A fresh reading shows what the printer reports now, not whether your computer can reach it or print successfully. If the menu labels or button sequence differ, use the model’s manual rather than trying a path intended for another printer. If the active connection shows no usable address, follow the troubleshooting section below.
Check an installed printer on Windows
Windows port inspection usually exposes a configured address when the printer uses a Standard TCP/IP Port. That address is a saved connection setting, so compare it with a current printer report before treating it as the printer’s present address.
- Open the printer’s settings. In Windows 11, go to Settings > Bluetooth & devices > Printers & scanners.
- Select your printer. Open Printer properties, then select the Ports tab.
- Find the checked port. This is the port selected for that printer queue. If it is a Standard TCP/IP port, select it and open Configure Port.
- Read the configured destination. Look for Printer Name or IP Address. Copy the explicit address if one is shown; if the field contains a hostname, use the printer’s report or router list to find its current numeric address.
- Cancel without changing anything. Close the configuration dialog with Cancel. This is a read-only lookup, so you do not need to add a port or alter its settings.
Use the destination field inside Configure Port, not just the port’s name. A port name can contain an address left over from an earlier setup, even when it no longer reflects the printer’s current connection. If the stored destination differs from a fresh printer report, confirm the printer’s identity before changing the computer’s configuration.
A separate device Properties dialog may show Connected Device information, and some entries may have Web Services details. This is different from Printer properties, which contains the print queue’s port settings. Do not choose between dialogs by counting tabs, and do not assume a Location field contains an IP address.
A WSD discovery-based port or a shared print queue may not expose the physical printer’s address through this route. Use the printer’s display, a fresh network report, or an authorized router lookup instead. If Configure Port is unavailable or access is restricted, stop the lookup there rather than changing permissions or guessing at another queue’s settings.
Check an installed printer on Mac
An explicitly IP-configured printer can expose a useful address in its Mac settings. Discovery-based entries and descriptive fields may not show a numeric address, so treat anything you find as a candidate to confirm.
- Open the printer settings. Choose Apple menu > System Settings > Printers & Scanners. Older interfaces use the name System Preferences instead of System Settings.
- Select the correct printer. Choose the entry you actually use for printing, especially if several entries have similar names.
- Inspect its details. Open Options & Supplies if that option is available. For supported printer entries, this screen can display the printer’s IP address.
- Check what the field contains. An explicit IP address is useful for comparison. An empty field, a room description, or a hostname is not a confirmed numeric address.
- Verify against current network information. Compare the candidate with the printer’s display or a fresh network report. If no explicit address appears, use the router’s connected-device list.
A Location field can describe where a printer sits rather than how to reach it. Text identifying a room or department is not an IP address, and a hostname is a name rather than the numeric address you are trying to find. Even when Location contains an address, confirm it independently before using it.
Do not edit Location to change the printer’s network address. Changing a descriptive field on the Mac does not configure the printer’s own network connection. For a basic lookup, leave the installed printer unchanged until you have confirmed its current address and know whether the saved connection needs updating.
Look in your router’s connected-device list
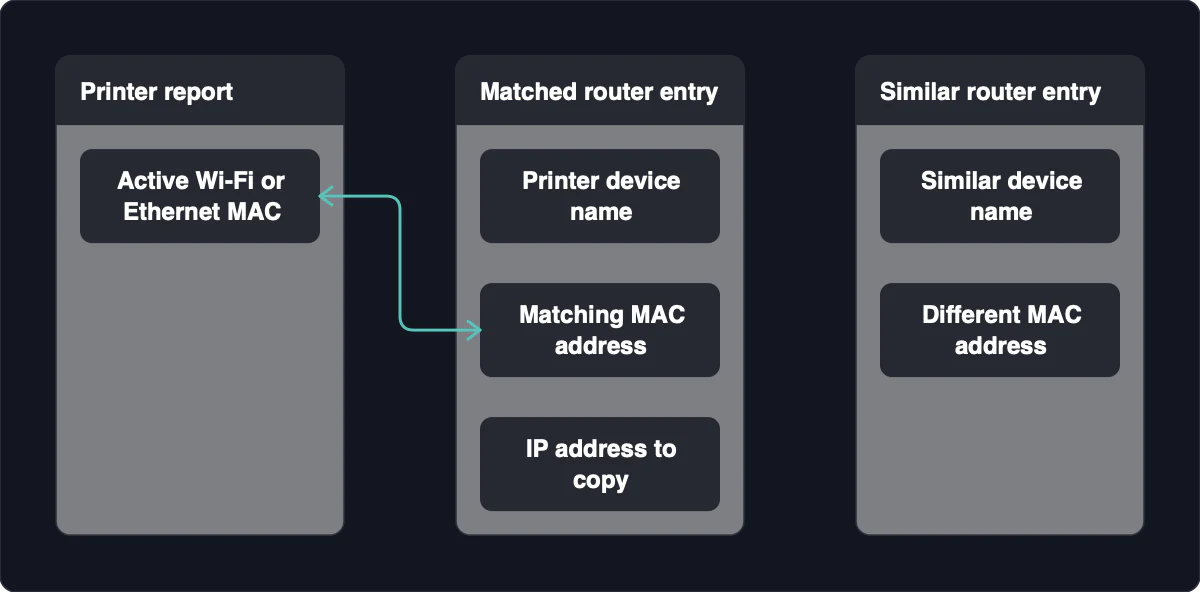
Your router’s connected-device list can identify the printer even when it is not installed on your computer. Match the entry by name and preferably by the active interface’s MAC address, since a generic manufacturer name can belong to more than one device.
- Use an authorized router account. Open the router’s documented local administration address or official app, and sign in only if you have access rights to administer it.
- Open the device list. Look for Connected Devices, Clients, DHCP Clients, or a similar section.
- Find the printer’s entry. Look for its name or MAC address and the IP address alongside it. Compare the MAC address with the printer’s network report when the name is unclear.
- Check the active interface. Match the information for the connection the printer is using, whether Wi-Fi or Ethernet. Do not identify it solely from an entry for a disconnected interface.
- Record the printer’s address and sign out. Leave the router’s settings unchanged after this read-only lookup.
The address you use to open the router’s administration page is the router’s address, not the printer’s. Copy the address from the matched device entry instead. If several devices have similar names, the printer’s report gives you a better basis for identification than guessing from the list.
If the printer is missing, check that it is powered on and connected to the intended network. In a router app, also confirm that you have selected the network where the printer is connected. A missing entry is a reason to check the connection, not to reset the router or change unrelated settings.
On a managed office network, ask the administrator to identify the printer or confirm its address. Do not guess administrative credentials or reset shared infrastructure to obtain access. You can still use the printer’s own display or report if you are authorized to access the device.
Resolve a missing or unusable address
A connected Wi-Fi or Ethernet printer normally has a network address; USB-only operation may provide no network address to find. Other results can point to an inactive interface, unsuccessful address assignment, or an outdated computer setting.
| Result | Meaning | Next action |
|---|---|---|
| The printer only supports USB connections | It may have no network IP address. | Use its USB printing setup. Connecting by USB does not automatically reveal a network address. |
An inactive interface shows 0.0.0.0 | That interface is not showing a usable assigned address. | Check the active Wi-Fi or Ethernet section. If the active interface also lacks an address, reconnect using the model’s documented procedure. |
| The active connection shows a self-assigned address | Normal network address assignment may have failed. | Check the connection and network settings, then follow the printer’s documented reconnection procedure. |
| The computer’s stored address differs from a fresh printer report | The saved destination may be stale. | Confirm the printer’s identity, then update or re-add the computer’s printer connection using the current address. |
| The router entry has an unclear name or is missing | The entry does not yet identify the printer reliably. | Compare the active-interface MAC address, check power and connection, and confirm the selected network. |
The connectivity warning for the Xerox models covered by this procedure treats 0.0.0.0 or an address beginning with 169 as a network connectivity issue. That is a model-specific diagnostic instruction, not a rule that every address beginning with 169 is invalid. Use the address’s context and the model’s guidance rather than its opening digits alone.
Start with the active connection and the printer’s documented network setup. Factory resets, disabling IPv6, and rebooting shared infrastructure are not default steps for finding an address. After reconnecting, read the display again or print a fresh report before retrying the computer’s setup.
For recurring address changes, an authorized administrator can use a router DHCP reservation tied to the printer’s MAC address. A reservation controls the address the router assigns on that network; a manually configured static address is set on the printer itself. Neither changing a computer’s print port nor editing a Mac Location field changes the printer’s own address, and any fixed setup must still fit the network where the printer is connected.
Confirm the printer before using its address
Confirm the device’s identity before adding it by IP address. Keep the lookup and subsequent printing on the intended local or otherwise authorized network, without exposing printer services to the public internet.
- Compare current records. Match the address on a fresh printer report with the router’s entry, if you can access it. Check the printer’s model or name and the active-interface MAC address rather than relying on the IP address alone.
- Use the confirmed address in the add-printer workflow. Enter it through your operating system’s normal printer setup, or correct an outdated installed connection after confirming the destination. Choose the driver appropriate for your printer.
- Print a test page. Use the setup workflow’s test-page option when offered, and check that the page comes from the intended printer.
- If the test fails, recheck the path. Confirm the current address again, check that the computer can reach the printer on the intended network, and review the selected driver. On a managed network, ask the administrator about access restrictions instead of altering shared network controls.
A successful test page checks the print path from that computer through its configured queue to the printer. A ping reply alone does not identify a device as your printer or prove that printing works. Likewise, finding an IP address does not establish an encrypted or private printing connection.
You do not need public port forwarding to complete this lookup. Keep printer services and remote administration off the public internet rather than using exposure as a workaround for a failed test. If printing must cross network boundaries, use an arrangement authorized for that network instead of assuming that knowing the address makes the printer safely reachable.
